Kumdan şelaleler süper ! ! !


ferdiaslanÇevrim Dışı

Kayıt: 11/12/2010
İl: Burdur
Mesaj: 83
ferdiaslanÇevrim Dışı
Gönderim Zamanı: 24 Temmuz 2011 16:18
Peki hersey tamam yukarı çıktı oda tamam asağı süzülürken kum dağılmıormu sağa sola ??
 

Üye imzalarını sadece giriş yapan üyelerimiz görebilir

mesutozturkÇevrim Dışı

Kayıt: 28/05/2009
İl: Ankara
Mesaj: 106
mesutozturkÇevrim Dışı
Gönderim Zamanı: 25 Temmuz 2011 00:01
[QUOTE=ferdiaslan]Peki hersey tamam yukarı çıktı oda tamam asağı süzülürken kum dağılmıormu sağa sola ??
 
[/QUOTE]
Kumun döküldüğü yerde fazla akıntı olmazsa su durgun olursa, bir de kum silis kum gibi ince taneli değilde biraz iri taneli olursa fazla dağılacağını zannetmiyorum. tabi şelalenin yüksekliği de önemli yükseklik arttıkça kumun etrafa dağılma olasılığıda artar gibime geliyor. saygılar 

Üye imzalarını sadece giriş yapan üyelerimiz görebilir

marslan389Çevrim Dışı

Kayıt: 13/12/2008
İl: Istanbul
Mesaj: 247
marslan389Çevrim Dışı
Gönderim Zamanı: 26 Temmuz 2011 02:05
İlerde belki bi fikir olur, güzel çalışma

Üye imzalarını sadece giriş yapan üyelerimiz görebilir

kerim_ozalÇevrim Dışı

Kayıt: 20/03/2011
İl: Mugla
Mesaj: 205
kerim_ozalÇevrim Dışı
Gönderim Zamanı: 27 Temmuz 2011 14:25
Güzel çalışma geçenler akvaryum yarışmasında birinci olan bi akvaryum vardı kenarları bitkili ortasında şelale görüntüsü var ona uygulansa daha gerçekçi güzel bi yapı olurdu yükseklikte yatarince az.

Üye imzalarını sadece giriş yapan üyelerimiz görebilir

FearOfTheDarkÇevrim Dışı

Kayıt: 10/03/2010
İl: Bilecik
Mesaj: 130
FearOfTheDarkÇevrim Dışı
Gönderim Zamanı: 29 Temmuz 2011 13:26
Bir kaç zaman önce bu çalışma üzerinde bir tefarruatlı çalışma yapmıştım. Kumun kanal dolaşımında akvaryuma dağılmaması için cam malzeme kullanarak kanal sistemini oluşturdum. Fakat kullandığım kum silis kumdu ve biraz tanecikleri ağırlığınca yüksek olduğundan hava motoru kumu yukarı bölüme ulaştıramıyordu. Anlayacağınız kumun perlit veya poza taşı gibi hafif taneciklerden oluşması gerekiyor. FearOfTheDark2011-07-29 13:27:19

Üye imzalarını sadece giriş yapan üyelerimiz görebilir

alpartürkÇevrim Dışı

Kayıt: 05/01/2009
İl: Balikesir
Mesaj: 389
alpartürkÇevrim Dışı
Gönderim Zamanı: 29 Temmuz 2011 14:01
Arkadaşlar verdiğim linki açın sayfayı gogul sayfa çeviricisiyle türkçeye çevirin herşey anlatılıyor.

Üye imzalarını sadece giriş yapan üyelerimiz görebilir

ferdiaslanÇevrim Dışı

Kayıt: 11/12/2010
İl: Burdur
Mesaj: 83
ferdiaslanÇevrim Dışı
Gönderim Zamanı: 29 Temmuz 2011 16:08
  • 1

    Use the emery paper to sand the edges of the 6-inch-wide piece of glass.

  • 2

    Pour a teaspoon of acetone onto the cloth and wipe the glass to remove fingerprints and any oil residue from the glass cutter.

  • 3

    Place the glass on a flat and dust-free work surface.

  • 4

    Use the emery cloth to sand the edges of the two narrow pieces of glass.

  • 5

    Pour a teaspoon of acetone onto the cloth and wipe the two pieces of glass to remove fingerprints and any oil residue from the glass cutters.

  • 6

    Squeeze a continuous bead of silicone sealer along the side-edge of the right hand, 18-inch length side of the 6-inch-wide piece of glass. Place the length side of one 2-inch-wide piece of glass against the bigger piece of glass to form a 90-degree angle.

  • 7

    Squeeze a continuous bead of silicone sealer along the side-edge of the left hand, 18-inch length side of the 6-inch-wide piece of glass. Place the length side of the other 2-inch-wide piece of glass against the bigger piece of glass to form a 90-degree angle.

  • 8

    Allow the silicone sealer to cure for 24 hours.

  • 9

    Squeeze a number of large balls of silicone onto the inside surface of the 18-by-6-inch glass and spread it across the entire surface of the glass with your finger.

  • 10

    Take a handful of aragonite sand and sprinkle it onto the silicone sealer, covering the entire surface. Allow the silicone to cure for 24 hours.

  • 11

    Lay the glass structure on its right side and squeeze several balls of silicone sealer onto the inside surface of the glass. Spread the silicone sealer evenly with your finger, covering the entire right interior surface of the glass.

  • 12

    Take a handful of aragonite sand and sprinkle it over the silicone sealer, covering the entire surface. Allow the sealer to cure for 24 hours.

  • 13

    Lay the glass structure on its left side and squeeze several balls of silicone sealer onto the inside surface of the glass. Spread the silicone sealer evenly with your finger, covering the entire left interior surface of the glass.

  • 14

    Take a handful of aragonite sand and sprinkle it onto the silicone sealer, covering the entire surface. Allow the sealer to cure for 24 hours.

  • 15

    Shake any loose aragonite from the glass structure.

  • 16

    Squeeze a tablespoon of silicone sealer onto the middle of the back, bottom surface of the glass structure. Place the Styrofoam block against the glass and hold it in place for a minute. Allow to dry for 24 hours.

  • 17

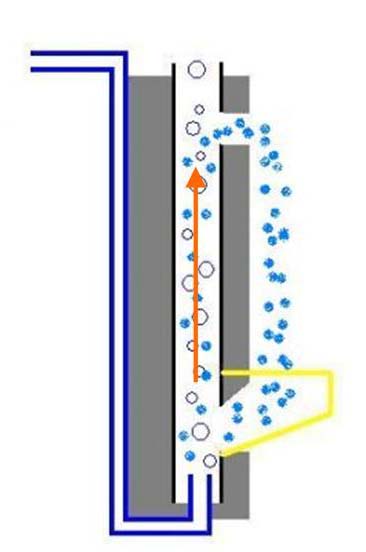
    Place a sturdy piece of string through the predrilled hole in the top of the glass structure. Hang the glass structure from a wall hook directly above the aquarium. Ensure that the lower end of the structure points into the aquarium and is approximately 3 inches above the water level.

  • 18

    Push one end of the transparent tubing over the exhaust nozzle of the submersible pump. Place the pump inside the aquarium, on the floor.

  • 19

    Push the free end of the tubing through the same hole as the string at the top of the glass structure. Face the end down onto the glass structure.

  • 20

    Fill the aquarium with water.

  • 21

    Plug the submersible pump into a wall outlet and turn it on.

  • İNGİLİZCESİ GENİŞ OLAN BİR ARKADAŞ DAHA NET AÇIKLARSA İYİ OLUR ?

    Üye imzalarını sadece giriş yapan üyelerimiz görebilir

    stranger592Çevrim Dışı

    Kayıt: 18/05/2009
    İl: Istanbul
    Mesaj: 230
    stranger592Çevrim Dışı
    Gönderim Zamanı: 02 Ağustos 2011 15:24

    Arkadaşlar bu gerçekten harika birşey,bunu yapan çinlilermi yoksa japonlarmı,aslında eğer varsa bunların hazırı getirtmek lazım oralardan(tabiki bi tanıdık bulup),şaka maka bi yana benim çok hoşuma gitti eğer bunların bilgileri,adresleri varsa ben sipariş vermek isterim


    Üye imzalarını sadece giriş yapan üyelerimiz görebilir

    goldangelÇevrim Dışı

    Kayıt: 30/10/2006
    İl: Konya
    Mesaj: 103
    goldangelÇevrim Dışı
    Gönderim Zamanı: 03 Ağustos 2011 07:48
    Çok güzelmiş yapımı da basite benziyor.

    Üye imzalarını sadece giriş yapan üyelerimiz görebilir

    mexmetÇevrim Dışı

    Kayıt: 13/04/2011
    Mesaj: 47
    mexmetÇevrim Dışı
    Gönderim Zamanı: 10 Ağustos 2011 10:51
    [QUOTE=mustafaerdogar]
     
    İşleyiş oldukça basit Egemen. Çizimde lacivert çizgili ince boru hava hortumu. Gri kısımlar strafor, kaya vs. olabilir. Maviler kum tanecikleri. Sarı çizgili kısımsa düşen kumun toplanıp sisteme geri akmasını sağlayan yapı (strafor vb. den yapılabilir). Hava motoru çalışınca hortumdan gelen hava kabarcıkları yüzeye çıkarken aynı zamanda oradaki suyada yukarı doğru bir akım vermiş oluyorlar. Kum tanecikleride çok ince olduklarından bu akımla yukarı çııyorlar. Bu bölüm normalde dışarıdan görünmüyor. Şelalenin çıkış noktasına kadar yükselen kum taneleri buradan su akımıyla birlikte dış kısma çıkıyor ve kendi ağırlıklarıyla tekrar aşağıya, toplama kabına iniyorlar ve şelale oluşmuş oluyor.
    [/QUOTE]
    bu sistemde üstten hava kabarcığı çıkmaması olanaksız gibi, hava kabarcığı çıkmaması nasıl engellenir.
    Alttaki videoda bunu bir şekilde engellemiş görünüyor...
    [VID]http://www.youtube.com/watch?v=GdomBs94wU4&feature=player_embedded#at=30[/VID]
    mexmet2011-08-10 10:52:56

    Üye imzalarını sadece giriş yapan üyelerimiz görebilir

    _U_U_R_Çevrim Dışı

    Kayıt: 21/02/2011
    İl: Istanbul
    Mesaj: 446
    _U_U_R_Çevrim Dışı
    Gönderim Zamanı: 10 Ağustos 2011 17:41
    Çok başarılı bir çalışma , paylaşım için teşekkürler.

    Üye imzalarını sadece giriş yapan üyelerimiz görebilir

    aydin_1975Çevrim Dışı

    Kayıt: 18/10/2010
    İl: Konya
    Mesaj: 36
    aydin_1975Çevrim Dışı
    Gönderim Zamanı: 11 Ekim 2011 11:03
    [VID]http://www.izlesene.com/video/akvaryum-kum-selalesi-tropheus-ndolered-tankim/4861773[/VID]
    aydin_19752011-10-11 11:04:49

    Üye imzalarını sadece giriş yapan üyelerimiz görebilir

    BadgeRÇevrim Dışı

    Özel Üye
    Kayıt: 22/04/2007
    İl: Izmir
    Mesaj: 482
    BadgeRÇevrim Dışı
    Özel Üye
    Gönderim Zamanı: 11 Ekim 2011 12:26
    Kısacası venturi. Kullanılacak kum olarak da akvaryumlarda kullanmayı tercih ettiğiniz aragonit kumu yeterli olur sanırım.

    Üye imzalarını sadece giriş yapan üyelerimiz görebilir

    relax03Çevrim Dışı

    Kayıt: 02/03/2011
    İl: Afyon
    Mesaj: 130
    relax03Çevrim Dışı
    Gönderim Zamanı: 11 Ekim 2011 16:54
    İnsan bu işi sevince çok güzel görüntüler çıkıyor , gerçekten çok hoş bir manzara.

    Üye imzalarını sadece giriş yapan üyelerimiz görebilir